Showing posts with label tutorial. Show all posts

Thursday, August 12, 2010

Sneak Peek: Been Boo'd! {boo kit}

You've been BOO'd!

What is BOO-ing? It's a fun neighborhood tradition that takes place in neighborhoods all over the country. It is the autumn version of "Secret Santa": secretly leaving small gift bags or BOO baskets, BOO instructions and a BOO SIGN at a neighbor's door. In turn, the neighbor is asked to BOO two others, leading to a chain reaction--and Halloween fun.

Accompanying the Boo-Gram is a collection of goodies, determined by the giver. The goodies may vary from small Halloween treats (candy, decorations and toys). The magic of these Boo-Grams is the reciprocation of this gift! It is expected that when you are "Boo'd", you must turn around and quickly "Boo" 2 other neighbors as well!

The possibilities for creating Boo Kits are endless, and now they can be 100% Papertrey!

Here is a fun BOO kit which I designed!

My daughter, Karen, loves to take my copic markers and make stickers with them with Avery address labels. She places the stickers, punched out with circle punches on the back of her cards. It gave me a great idea for some candy wraps for a Boo Kit.

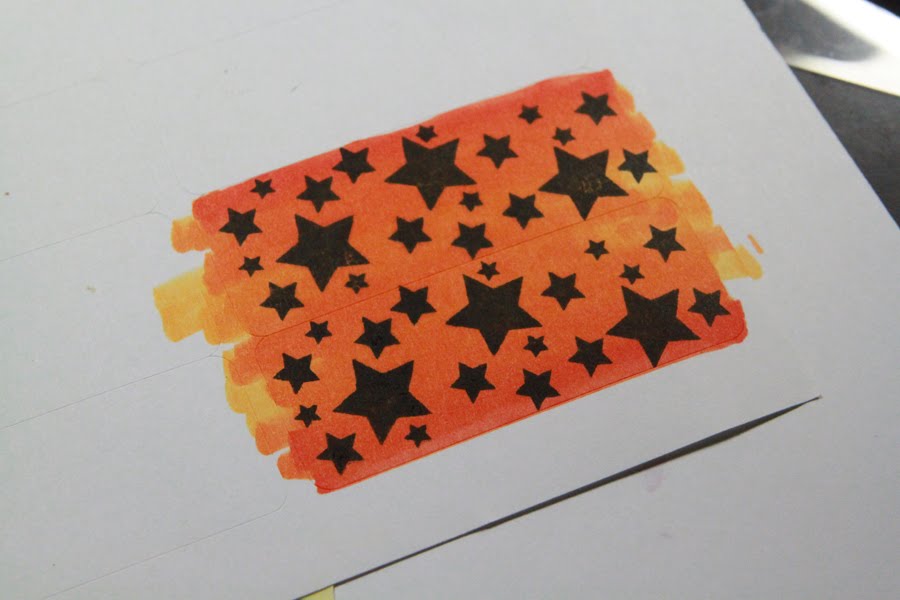
First start out with some markers and some Avery address labels....color your light color first

Add some darker ink to the edges of the label...


Go back and add some ink to blend in the colors....


I used the star cluster stamp which fits perfectly in an Avery Address label with the True black ink.

Look how nice and clean that black pops against the copic background on the label.

Using clear acrylic stamps allows you to stamp several labels at once....

doesn't that look nice?


Simply peel the label off the sheet and wrap them around Hershey's Nuggets.

Look how adorable these are....these make a great addition to your boo kit!


I created a candle to go in the kit. I found an expensive Pumpkin Spice candle and wrapped the outside of the candle with designer paper and then added some stars (stamped in terracotta tile and summer sun) with buttons. I created a simple tag and added some terracotta ribbon and rustic thread. Very simple and festive for the Autumn season! The tag reads "ghostly greetings".
You can use any type of container to put your goodies in. I used a simple kraft bag, stamped with some of the fun stamps from Been Boo'd. I used some ribbon on the handle and stuffed the bag with some white tissue paper spritzed with copper and graphite glimmer mist.

Here is a close up of the tag. I love this little ghost, but he looks a little friendlier with a cute little witch hat. The hat and ghost are both stamped on stampers select white with true black ink. I used some stickles on the edge of the hat and ghost. I added some copics to the edges of the ghost to give it some definition.


The reverse of the tag has the Boo Poem, which is also part of the Been Boo'd set. It is great to have this, because you need to include a few copies of this poem in your kit.
Daring players attempt to "Boo" their neighbors in the broad daylight or early evening hours, as it increases the possibility of getting caught... those familiar with the famous "doorbell ditch" prank of their childhood years will be happy to know that this tradition lives on, though the recipient gets a fun gift in the process.

Many neighborhoods start in early October, however the common time to start seeing "Boo-Grams" is a couple of weeks before Halloween. With this new set from Papertrey, you don't have to wait for someone to "Boo" you! Now you can start the tradition in your neighborhood... you'll be surprised how quickly the excitement spreads around the neighborhood!

Ready? Set? BOO!


Wrapped candy:
stamps: Been Boo'd (Papertrey Ink, available August 15)
ink: black, copic markers (various oranges and dark yellows)
misc: avery address labels and Hershey's nuggets

Ghostly Greetings Candle:
stamps: Been Boo'd (Papertrey Ink, available August 15)
ink: terracotta tile, summer sun
paper: white, designer paper (DCWV stack)
misc: star punch, buttons (PTI), candle

Boo Kit Bag:
stamps: Been Boo'd (Papertrey Ink, available August 15)
ink: black
misc: kraft gift bag, ribbon (PTI), tissue paper, copper and graphite glimmer mist

Boo Tag:
stamps: Been Boo'd (Papertrey Ink, available August 15)
ink: black
paper: Kraft, white, terracotta tile
misc: ribbon (PTI), circle punch, rustic thread, stickles, dimensionals


Wednesday, February 11, 2009

Valentines up the WAZOO!!!!


Seriously - let's total them up:

Xavier: 16
Sophie: 16
Karen: 29
Victoria:26
Isabella: 25
TOTAL: 112
(Add on another 29 for Karen's friend MB who was over stamping with us last week and we have definitely hit WAZOO numbers!)

I decided to make ATC (Artist Trading Cards) Valentine cards this year. WHY? Because they are small, manageable and there is less paper waste.

Xavier insisted on having a tiger on his - until he saw my collection of stamps and then wanted a red alligator (Wild About You! ~SU!) Xavier's favorite color is red - so we went with the red base and the real red ink. The back of his card is stamped with the SU! set (Heart Sentiments & Simple Alphabet)

I used the Our Craft Lounge Treemendous Love set for the majority of the cards - pretty in pink or real red card base with an oval scalloped punched main image - colored in with copics. The back is stamped with their name!


Sophie's valentines are purple because she would not have it any other way! I used Heart sentiments - lovely lilac paper, tempting turqoise paper and glossy paper for the main heart. I created my own background paper using a sheet of white paper and an acrylic block - utilizing the sentiments and small hearts from the PTI set Heart Prints.


Here is the ATC template for creating 10 ATC's with one sheet of 8.5x11 cardstock!

Xavier's Valentines - paper {real red, white cardstock} ink {real red, black archival} marvy punch, Wild About You (SU!) sentiment (printing on back - PTI Simple alphabet, Heart Prints)

Girls Valentines - Our Craft Lounge - Treemendous Love, paper {real red, pretty in pink, pink passion, white}, ink {black archival, copics}, marvy scalloped punch

Sophie's Valentines - paper {lovely lilac, black, tempting turqoise, white}, ink {lovely lilac, black}, stamp: Papertrey Ink {Heart Prints}, heart punch


Thursday, February 5, 2009

PTI In the Bag Challenge: Bagalope full of love!


So Nichole Heady proposed that the blog readers play in her "in the bag" challenge as part of her anniversary celebration! Who am I to refuse my BFF?

I chose to make a bag-o-love Free Smiley Courtesy of www.millan.net out of an envelope! They call them Bag-a-lopes. I had a large legal size red envelope in my drawer - so I decided that would make a cute bag-a-lope. Is anyone not familiar with this project?
Step 1. seal your envelope and trim off one of the sides of the envelope. This will become the top of your bag.
Step 2. Using your Scor-pal, score each side of the envelope, except the side that is cut open, 1/2" toward the center. Score the same distance on each side *that is so important*. These scored lines will work best if you crease them aftewards with a bone folder.
Step 3. Place the envelope out flat and stamp. Keep in mind that the open end is the top.
Step 4. Using your hands, open the envelope to expand it like a grocery sack. With the other hand, push the bottom of the envelope UP toward the inside until it hits the crease lines you made. There will be two little triangles to tuck under on the bottom to give the bottom of your bag support. Glue or tape the triangle areas on the bottom.
Step 5. The side creases should fold in slightly to create a nice crisp sack.

PHEW! That was long winded!

I stamped the bag-alope with fresh snow ink using Heart prints and the small heart from around and about
sentiments. I stamped the tag with the heart from Around and about sentiments and Fresh Alphabet, along with the "just for you" circle sentiment from Around and about sentiments.

The bag topper includes a layer of white paper, then a layer of kraft paper, punched with the scalloped edge punch. The tag is punched with the circle punch and the circle scalloped punch. I used the crop-a-dile to punch through the bag and the bag topper - it goes through like BUTTAH! Threaded through some of the pure poppy red polkadot ribbon from Papertrey. I used the fresh snow velvet ribbon to attach the tag to the topper.

Now for the yummies - Hershey's kisses and nuggets. The nuggets are wrapped in avery address labels. I used the pure poppy ink with the sentiments and hearts from the Around and about stamp set to create these cute labels. I think I will sneak this in Todd's briefcase! He sometimes needs a pick-me-up during these rollercoaster days on the market! Wouldn't these make adorable teacher gifts!?!?!


paper: kraft {SU!}, white {Papertrey ink}
ink: fresh snow, pure poppy {Papertrey ink}
stamps: fresh alphabet, around and about sentiments, heart prints {all Papertrey ink}
misc: Papertrey ink ribbon (fresh snow velvet, pure poppy polkadot}, avery address labels, scalloped circle punch (SU!), circle punch (SU!), scalloped edge punch (SU!), crop-a-dile, Hershey's kisses, Hershey's nuggets


Thursday, January 8, 2009

Tutorial: How to create fun edges on sentiment labels


I am always looking for new ways to create with the tools that I have. Take sentiments for example. There are millions of ways to add sentiments to your cards. I sometimes create the perfect sentiment on my computer with the plethora of fonts I have! Take this card (You light up my life). I printed the font on the computer, then cut the strip with my paper trimmer to make sure it was even.

It was boring as a plain rectangle. I wanted to pull an Emeril!!! {BANG! Free Smiley Courtesy of www.millan.net } Spice it up a notch! I used my Stampin' Up! scalloped square punch and decided that I could use my existing tools (it was lying on my desk at the time) to create a new look.


First, turn your punch upside down.


Next....thread your paper through the punch as shown....make sure it is perfectly even on each side!


Press down and PUNCH!


Once you punch your first side, remove it from the punch and rethread the paper on the other end.


Punch your other side - remembering to line it up evenly~


For this card, I punched the tempting turquoise and the white separately. Adding brads or baubles to each side is a fun way to dress up these sentiment labels.


Try creating your own label by using the Stampin' Up! scalloped square punch - and post your creation here in the comment section!


Stampin' Up! ® scalloped square punch

Tutorial: How To Add A Permanent Signature in Blogger

Sometimes I create signatures for people who want to upload them to blogger themselves. If you are willing to play with your blogger dashboard - try uploading your signature permanently using the following steps:


Step one - have me create you a signature (LOL!) Just kidding - make sure it is the same background color as your blog or get one with a transparent background (ie. PNG file)

Step two - Create a post and upload your signature as a photo to a post in your COMPOSE tab

Step three - click on the EDIT HTML tab and copy the HTML code of that photo

Step four - DO NOT PUBLISH YOUR POST (you can add a title to the post ~ for example - DO NOT DELETE - BLOG SIGNATURE). Save your post, just do not publish it.

Step five - go to the SETTINGS Tab in your dashboard.

Step six - click on FORMATTING tab and scroll ALL the way to the bottom of the Formatting page. You will see a POST TEMPLATE box.

Step seven - paste your HTML code (from your signature) in the Post Template box.

Step eight - save your settings

Now each time you create a post, your signature will automatically pop up in the compose portion of your post.

Variations: Since I upload so many cards and I was tried of writing "Supplies" - I created a custom Supplies graphic which atomatically uploads each time I post - if I don't want to use the supplies graphic (ie. if I am not posting something with a supply list), I just click on the graphic and delete it!

Hope this helps!


Friday, July 11, 2008

Idea!!! Clear Blocks

I just {heart} Tarjay! I love that I can go in there and find ANYTHING that I need. I bet you could live in Target! Who was I having this conversation with? I cannot remember. I do remember that the only problem is there is no washer and dryer. You can pretty much take care of everything in the Tarjay though. Coffee pots (and I found this new YUMMY coffee creamer there - International delight White Chocolate Mocha).

I swear that Todd is addicted to S'mores! Everytime we go to the store he is buying marshmallows, graham crackers and hershey bars. The man is nuts for S'mores! NUTS! What could make S'mores even better? Chocolate Marshmallows! (bouncing).

We found chocolate marshmallows at the TARJAY! {nods!}

It's great to find a great thing, like S'mores and find something to make them even better {like chocolate marshmallows}!

Well, I think I found something like that in my stamp stash.
My good friend Mish is one of those people who inspires me to be a more efficient stamper. You have out your supplies - you might as well use them and be more efficient. So when I have to make a supply of cards, I turn to Mish's idea and mass produce with paper, ink, punches. Simplify and make an assembly line of things! Despite my investment in the nestabilities, I still use my punches on occasion, and for this project I could use the punch or the nestabilities.


Did you ever have a wood mounted image you want to use, but you fumble around trying to get it to line it up to fit within your punched image. I always had problems lining up the image. I would try and fumble around, circular filing most of my attempts. If I put the wood mounted image face up on my surface and place the paper down, I had trouble with shadowing and getting a nice clean image!

Edited to add:
Now I know that you can stamp the images first, then punch them out - but that slows me down when I am doing mass assembly. If there was a perfect way to stamp 10 images on a sheet of cardstock, then punch the giga circle punch out with the images perfectly aligned every time - I would do it. For mass assembly, this works better. So for those of you who have space perception issues like me, read on.... This is even more important for nesties owners who want to mass punch their paper. I found it tough to line up the nestie dies (I use a sizzix with my nesties). It always seems to shift the paper slightly and my pre-stamped image is offset! (that makes me :< sad)

One of the items which is now always in my stamping area is clear acrylic blocks. This morning, the lightbulb went off!!!!

I think I have an idea (bouncing)....

First - gather your supplies:
paper, ink, stamps (wood mounted), mono and a clear block.
I had this clear block from (Dah Dah DAH! The Tarjay dollar spot)


Punch out the circles in white cardstock....

Take your mono and place a little dab on the card

place your circle on a clear block

ink up your wood mounted image


place the inked image face up on your work surface
with the help of the clear block, you can easily place the paper
over the wood mounted image


gently press on your acrylic block. The hard surface gives you a nice firm even pressure for
a great clean stamped image
lift acrylic block off wood mounted image and you have a clean image
without shadows. The clear block holds your paper in place (with the mono), so there is no shifting or double imaging. Mass production is now simplified!


Finish your card

~~~~~~~~~~~~~~~~~~~~~~~~~~~~~~~
supplies:
stamps: If the Halo Fits (SU), sentiment (fresh cuts)
ink: black, copics, chocolate chip, pixie pink
paper: white, designer paper (MME/WA)
misc: dimensionals, sakura stardust, ribbon (mayarts/starlistudio), punches (marvy)


blogger templates | Make Money Online