Thursday, July 31, 2008

Hanna Sneak Peek - Teacher


WT177 is using scraps. My entire stamp room is full of scraps! I used a scrap of designer paper for the flower (making it with a clear button on top), and popping it up with dimensionals. I used two scraps of cardstock from my scrap bin. Guava and pomegranate (textured). The sentiment was stamped on a piece of white scrap paper, punched with a word window punch. I used scraps of ribbon too! I am scrap-a-licious today! The guava is dry pressure embossed with the new CB border folder. I got it at Eclectic Paperie. The sentiment is from the new Hanna set - Teacher - which is being released on August 1 (tomorrow) - which is also Xavier's birthday. WOOHOO! My lone soldier is turning 5! Party at the pool tomorrow!
Don't forget the Hanna Release Party tonight! Check out the Hanna Stamps! MEMBER COMPANY Forum tonight!
~~~~~~~~~~~~~~~~~~~~~
supplies:
Stamps: Hanna {teacher}
paper: Scraps of pomegranate, guava, white & sahara sand base, My Minds Eye dp
ink: black
misc: punches (su circle scallop, word window), clear button (SU!), ribbon (SU!), dimensionals, CB folder (borders)
Kitchen Sink Stamps: New Release Sneak Peek


Do you see what I see? I have some of the new releases from Kitchen Sink Stamps on this photo. I took this picture of Bella coloring on the driveway. I made a frame with some fun Kitchen Sink Stamps which are getting released on August 5. Can you see what I see? Two of the sets are on this frame. It was a wooden frame which I covered with cardstock. It is all red and black with a hint of white. It is actually a gift for a birthday, but I put Bella's photo in it. The stamps were perfect for this project. You will {heart} these stamps. I cannot wait to show you the FULL MONTY on this frame.....

Hanna Sneak Peek - Luau

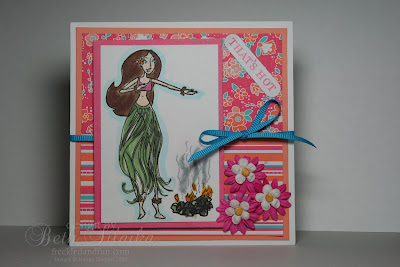
Here is another sneak peek of one of the Hanna's which will come out this week. It is a mini set. Here she is dancin' the hula at a Luau! I had a kit which I picked up from Target a year or so ago. It was on an endcap - a making memories kit for a minibook, and it sat dorment in my stamp closet for a long time. I tore into that thing yesterday like a little kid at Christmas. It looked like great paper to use for this Luau set. I made this a 5x5 square card. The papers were trimmed and layered on the card, and Hanna was stamped on white paper with archival black. I colored her with copics. I stamped the fire as well, then colored it with copics and a little sakura stardust silver. I layered some primas, took some apricot SU! brads and colored them with my copics to match the orangey/apricot color of the papers. Some turquoise THIN grosgrain ribbon tied in a regular bow (I never do those anymore). The sentiment was part of the kit. I punched it out with my word window punch. This kit was like $2 on the endcap - and I used very little of the items in the kit - so it was a good deal! Stay tuned for my LAST of the Hanna releases tonight or tomorrow....

~~~~~~~~~~~~~~~~~~~~~~~~~~~~~~~~~~~~~~
supplies:
stamp: Hanna Luau
paper: white, mm kit
ink: archival, copics
misc: ribbon (offray), primas, brads (SU!) colored with copics, sakura silver, ww punch (SU)

Tuesday, July 29, 2008

Hanna Sneak Peek - Halloween {Trick Or Treat}

Here is a little trick or treat sack which I made with my new Hanna Halloween set called Trick Or Treat. I used some wasabi textured cardstock (yes! I have some leftovers) With the pre-scoring - I just needed to make one score. I used my nestablilites and cut a scalloped circle in the front of the wasabi. I also cut a little frame with nestabilties and some pumpkin paper. I stamped the Boo! sentiment directly on the wasabi candy holder with black ink. I love this new archival black ink by Ranger. It makes a great clean images! I stamped the pumpkin on white cardstock and colored it in with Pumpkin ink. I also used a wasabi drenched blender pen for the stem. I trimmed up the pumpkin and put it on the open circle. Three (naked) buttons on the bottom corner and some orange polka dot ribbon on the top!
The bag holds some Cami-patties. What are Cami-patties. Let me tell you! My friend Cami came up with these awesome treats. You take your SU! scalloped circle punch, you stamp the sentiment (for this I used Trick or Treat), and then you apply some mono on the back of the cardstock and stick the scalloped circle on either side of a peppermint patty. I like these because Peppermint Patties are not my favorite - so I don't snack while I am stamping! I digress! I put the Cami-patties in a baggie (from Michael's) and attached it to the inside of the holder. You can use staples or brads to hold the bag in place! Happy Halloween! (And play along with the Hanna Stamps! challenge #28 (HSC28) at SCS by using Buttons on your project) HSC28 is the keyword.

~~~~~~~~~~~~~~~~~~~~~~~
supplies:
stamps: Hanna! Trick Or Treat
paper: wasabi, pumpkin, white
ink: archival black, pumpkin (marker), wasabi (blender pen)
misc: nestabilities, SU! scalloped circle punch, ribbon (mayarts/starlitstudio), buttons, peppermint patties.

Monday, July 28, 2008

Hanna Sneak Peek - Pirate Hanna

So if you saw the post from earlier today - it was my oppsie! I read the wrong set dates and put out a real sneak peek! Tune back in next month for that gift set.

On to the real card today! This is ARRGGGHHH!! (sorry - had to talk like a pirate). SURRENDER THE BOOTY! GIMME YOUR STAMPS AND NO ONE GETS HURT!

This one has a few fun things - first - is is my HSC28 card (Hanna Stamps Challenge Card - #28 - buttons (I had a starfish button).

Here are the card details:

White base with a layer of blue bayou. I used my new frills border embossing folders from Epaperie on the sides! I had some fun paper in my stash from DCWV. I sewed it on the bayou. with a stitch on the edge. I stamped Hanna with archival ink and colored her with copics. I placed her on the chocolate chip mat, then on dimensionals, and added some fun ribbon (Mayarts/starlitstudio). Surrender the booty sentiment printed on the computer. Starfish placed on the bottom corner....

~~~~~~~~~~~~~~~~~~~~~~~~~~~~~~~~~~~~
supplies:
stamps: Hanna! Pirate
ink: black, copics
paper: white, blue bayou, DCWV
misc: janome sew mini, starfish button, ribbon (Mayarts/starlitstudio), cuttlebug edge folder, dimensionals

Saturday, July 26, 2008

FS77: Artystamper

This week's Featured Stamper is Julia (aka Artystamper). This is the card which she made {I felt the baby shoes}. I created this card with the new Sock Monkey set from SU! I also used the new sentiment from SU! called Heard from the heart. This was a fun card to make.

Changes: stamp set - ribbon

I started with a white base. I stamped the sentiment in archival black on the white base. I stamped the cupcake from the sock monkey set on whisper white, then again on designer paper (crate paper). I colored the bottom of the cupcake/white cardstock, then trimmed the top of the cupcake/designer paper, and placed it on the white cardstock copy. I punched the cupcakes out with a circle punch. I punched the scalloped circle in celery. Now was the fun part. I did not have the Martha lacey punch, but I did have my new SU! punch. I used the new su scallop punch, then punched holes in each scallop with a regular hole punch. Then I ran it through the Paisley CB folder. Not the same thing, but pretty kewl! Two layers of bashful blue, run through the swiss dots folder. The cupcake images are raised on dimensionals. I also used some fun Mayarts ribbon which I got from Cindy (starlitstudio). Two big Tarjay pearls on each end of the sentiment. A little sakura stardust on the candle and the bottom of the cupcake.

What do you think! Good case?
~~~~~~~~~~~~~~~~~~~~~~~~~~~~~~~~~~~~~~~~~~~~~~~~
supplies:
stamps: sock money, heard from the heart (SU!)
ink: archival black, SU markers (pumpkin, bashful, celery)
paper: bashful, celery, white, crate paper
misc: dimensionals, ribbon, pearls, circle punch, scalloped circle punch, CB (paisley, swiss dots), sakura stardust (candle, cupcake bottom)

Friday, July 25, 2008

Design: Watermark requirements for SU!


Did you know that Stampin' Up! ® requires both customers and demonstrators to watermark their creations when they upload them to online galleries, websites and blogs? I didn't realize that. I also found out the requirements which Stampin' Up! ® has for their copyright information.

According to the "watermark expert" at demonstrator support, "the watermarks should have Copyright Stampin' Up! ® below or near the image. The year is no longer required in the watermark."

You can always ask me questions about watermarks. I will research it for you and post those questions in my Frequently Asked Questions section {FreckledANDFun-FAQ}

SCS Non Raffle:

Thank you Michelle Yager for bringing this to my attention!!!!

The number one Stamping site on the 'net {Splitcoast Stampers} is having a Non Raffle - to benefit the victims of the Midwest Flooding. Please consider donating money to the Red Cross in the Midwest to win a prize (check out the prize gallery). My good friend Michelle Yager used to live in Iowa, and this really has effected her, so I wanted to participate somehow. I decided to donate four (4) $15 Gift Certificates for Custom Graphic Design. The winner can apply their certificate towards any watermarks, blog banners or custom signatures.

Be sure to donate! You have to be in it to win it - and even if you don't win a prize, you are giving back to a really good cause!


Wednesday, July 23, 2008

Color Round Up # 17: I love you


Here is Kristina Werner's Color Challenge #17

I told you I got to stamp today! TWO CARDS!


I was looking at that dress thinking how awesome it was! I took a piece of whisper white paper and grabbed a few stamp sets and created my own patterned paper. I used the regal, rose and sage ink with Kitchen Sink Stamps (Happy Birthday Cupcake and Swirly hearts & stars, plus Ready 4 any holiday).

The faux designer paper was easy to create - just keep stamping and filling in white space. The regal base has a piece of sage paper atop it. The sage paper is punched with the new SU! scalloped edge punch. I used whisper white to stamp the sentiment on (from KSS - Ready 4 any holiday). I used the SU! designer label punch (regal rose paper) and a larger circle punch (regal rose). The white circle is on dimensionals, just atop some MayArts (starlitstudio) ribbon. I used three rose baubles on the bottom edge. Ta DA!

Did I mention that all Kitchen Sink Stamps are on sale at 15 % off Today, Tomorrow and Friday!
Promo Code HOT
~~~~~~~~~~~~~~~~~~~~~~~~
supplies:
stamps: Kitchen Sink Stamps (Happy Birthday Cupcake, Swirly Stars & Hearts, Ready 4 Any Holiday)
ink: regal rose, rose red, sage shadow, black (ranger)
paper: regal rose, rose red, sage shadow, whisper white
misc: rose baubles, dimensionals, punches (circle, designer label, scalloped edge), ribbon (mayarts/Starlitstudio)

Color Round Up # 17: Hi Regal Rose Sage!!!


This is the color inspiration from Kristina Werner's blog - I love to participate, but hardly ever get to play! Today I made a point to get stamping! It's one of those crazy rainy days here on the East Coast - thunder ALL DAY! Lots of Lightning. I took the kids to VBS and then out to lunch at the Cracker Barrel!

Some napped, some played with their webkinz and I stamped! Here is my first card: I used a regal rose base. I corner rounded the edges, used versamark ink with my backgrounds and borders set from Kitchen Sink Stamps. I used SU! white embossing powder and heat set the card. I used a Rose Red Scalloped circle and whisper white circle. I stamped the HI sentiment (Kitchen Sink Stamps/Playful Alphabet) with Regal Rose ink. I used a Sage Ribbon to make it look like a flower. Rose Red scalloped circle on dimensionals.
Seriously easy card! Seriously!

OH! OH! OH! Don't forget the sale on Kitchen Sink Stamps - today, tomorrow and Friday (23-25 July) - 15% off - Promo Code is HOT
~~~~~~~~~~~~~~~~~~~~~
supplies:
stamps: Kitchen Sink Stamps (Backgrounds & borders, Playful Alphabet)
paper: regal rose, rose red, whisper white
ink: regal rose, versamark
misc: white embossing powder (SU!), Sage ribbon, dimensionals, nestabilities, corner rounder


Tuesday, July 22, 2008

It's Getting HOT!!!!

It's July and it is GETTING H-O-T!!!
Yesterday, we celebrated a milestone with our work family! Todd and his two business partners have been at the new firm for two years! YAY! We are thrilled to pieces with our new home at Merrill!

Here are the guys celebrating last night - a little bubbly, a little BBQ and good friends!

It was hot yesterday - real hot! We have had some seriously awesome POP UP Thunderstorms! The heat has been intense and the storms really quick and fast moving! That is what happens in the summer in New York! Hazy Hot and Humid! Speaking of Hot......Kitchen Sink Stamps is having a 3 day HOT sale! 15% off from July 23-25! And guess what is the promotion code? HOT

Here is the card I made with some of my KSS sets tonight! I love grabbing some patterned paper and throwing together a quick card!

I used a white base, then placed some patterned paper on it. I used my new scalloped edge punch on the blue polkadot layer. I adhered some velvet rick rack to the paper and then placed some pearls on each edge. The hibiscus stamp from Kitchen Sink Stamps was done on white paper, I used (1. blush 2. pretty in pink 3. regal for the flower and rose red and bravo burgundy for the stamen). I used celery and moss for the leaf. I edged the circle with bravo burgundy. I placed it on a scalloped die cut circle from patterned paper. Heartfelt sentiment is from Other Important People, also a Kitchen Sink set. I used sakura stardust on the edges and stamen, and I used dimensionals to pop up the main image.


Don't forget to JULY Kitchen Sink Contest!!! This month's contest - free your spirit! There are a few catagories to enter - so check out the contest thread and start stamping!!! You have to enter by July 25 at MIDNIGHT!
~~~~~~~~~~~~~~~~~~~~~~~~~~~~~~~~~~~~~~~~~~
supplies:
stamps: Kitchen Sink {hibiscus, other important people}
paper: white, designer paper (my minds eye)
ink: black, blush, pretty in pink, regal, rose, bravo burgundy, celery, moss
misc: dimensionals, velvet rick rack (starlitstudio), pearls (target), sakura stardust, nestabilities (ellen hutson)

SEMI CUSTOM BLOG BANNERS:

One of the things I have wanted to do for some time is offer affordable banners to my customers. I love creating custom banners for my customers, and now you can have the custom look without the custom price with my affordable pre-made banners.

Each banner has set fonts which are easily changed with your blog title and tagline. I will be offering more pre-made banners in the coming weeks and months. What is wonderful about these banners is I will be able to change the fonts and font colors to suit your needs. A custom look for an affordable price!

SEMI CUSTOM BLOG BANNERS


Monday, July 21, 2008

Designs:


I have placed a few quick links in my upper right sidebar for my design work. If you have questions about watemarks, want to see the blog banner samples, or want the order forms, please click on those links and it will take you right where you need to go!

I hope that makes things more clear for my design customers!!!!


Sunday, July 20, 2008

FS76: Susiestampsalot

This week's Featured Stamper is Susiestampalot. She had a nice clean style which everyone will surely fall in love with! Her gallery has a ton of cards to oogle over! I used her Flutterby Just Because card as my case card.
Changes:
I used the pinks and greens, but used the new SU! colors. I used the Bella Rose designer paper. I stuck with a butterfly, but used the new Dreams Du Jour, a SU! set which will be available in the next catalog. I also used some great MayArts ribbon (which matches the new Pink Pirouette absolutely perfectly!) Instead of the main image being on a scalloped square, I used a circle for the main image. Lots of dimensionals. My opinion on the new Stampin' Up! colors - TWO THUMBS UP! (I was skeptical seeing the swatches online).
Details: white base for the card, then a layer of Pink Pirouette. A layer of the Bella Rose designer paper (CAN YOU BELIEVE I CUT IT???) and a layer of the Kiwi cardstock. SU! scalloped circle punch layer (pink pirouette) with pierces in each scallop, Kiwi circle with the butterfly stamped on it in black. Butterfly also stamped a second time (on white) and trimmed, then colored with copics. Butterfly was then covered with sakura stardust and placed on the kiwi layer with monoadhesive. I placed the kiwi circle AND the scalloped circle on dimensionals. Finally, I used three baubles (green) on the side to replace the brads which Susie had used on her card.

~~~~~~~~~~~~~~~~~~~~~~~~~~~~~
supplies:
stamps: Dreams Du Jour
paper: Pink Pirouette, Kiwi Kiss, Bella Rose DP, WW
ink: black, copics
misc: ribbon (mayarts/starlitstudio), dimensionals, punches (circle, scalloped circle - both SU!), sakura stardust, baubles


Saturday, July 19, 2008

Genevieve Elizabeth, One Year Later


One year ago, I was blessed with my sixth child. A happy little girl with blue eyes and jet black hair. She was the last piece of my puzzle and has made me fall in love with being a mom again and again, each and every day. She has an infectious smile and a charming personality. She is adored to pieces by her brother and sisters. I am so in love with this little baby. She is by far the most easy going of the six pack! Happy Birthday Genevieve Elizabeth! I adore you to pieces! You are the sunshine in my morning girl!


Wednesday, July 16, 2008

Design: Blog Banner {Happy PaperCraft Happenings}


Anita wanted her blog banner to look like her favorite patterned paper. I created this banner based on her request. Do you recognize the paper?

Tuesday, July 15, 2008

KSS: Graduation - Class of 2008

LinkI thought that I got away from Graduation season without having to make a card. I really though so...but then I got an announcement in the mail the other day, so I felt the need to make a card. These are the school colors (black and what looked like pomegranate on the announcement). I whipped this one up with my 3 step graduation stamp set from Kitchen Sink Stamps. I started the cap with going grey (solid - step 1), then with basic grey (stippled - step 2), then finished it with black ink (base of cap and tassle - step 3). Punched the image out with the circle punch and layered it on a scalloped circle. Look out world and Class of 2008 sentiments from the same set. I used the swiss dots cuttlebug folder on the black and pomegranate paper. The tassle is stamped with pomegratate ink (step 1 - solid (stamped off)) and then again with pomegranate (step 2 - tassle strings). Pomegranate stitched ribbon from SU! All paper and ink from Stampin' Up!. I stamped the cap twice and trimmed the mortar board top and popped it up on dimensionals. I added a small bit of sparkle with a sakura stardust pen on the 2008 and tassle.

~~~~~~~~~~~~~~~~~~~~~~~~~~~~~~~
supplies:
stamps: Kitchen Sink Stamps {3 step graduation}
paper: white, pomegranate, black
ink: pomegranate, black
misc: ribbon (SU!), punches, cuttlebug, sakura stardust


CC175: Just Because


Do Emily's Color Challenges ever scare you? LOL! This one scared me: Almost Wild Saffron (almost amethyst, wild wasabi and so saffron)
I decided to pull out my new Kitchen Sink Stamps Plaid Plus stamp set. I also grabbed the Other Important People set. It has some great "people" and sentiments.

So for this card - I decided that the black was necessary to make the colors just POP! I started with a black base and placed a Swiss Dots CB layer (white) atop it. Then I grabbed some white paper and the saffron ink pad. I was able to easily create this plaid paper with a little ink and some patience. You line the first image up... stamp and line up, stamp and line up...you get the idea. I used the thick line as my starting point. Then I used some wasabi ink and added the stars. Thought they looked cute on there. Some punched paper scraps of wasabi (textured) and amethyst with the scalloped punches in my stash. I put a layer of black, then stamped the sentiment "Just Because" (other important people) in amethyst ink. I placed that and some wasabi striped ribbon on the card and it is done. I like it.....what do you think? I hated the sentiment in amethyst - you couldn't see it - so I changed it to black ink and added some brads....now I like it!
~~~~~~~~~~~~~~~~~~~~~~~~~~~~~~
supplies:
stamps: Kitchen Sink Stamps {Plaid Plus, Other Important People}
ink: saffron, black, wasabi
paper: white, black, wasabi, amethyst
misc: punches, ribbon, cuttlebug (swissdots/epaperie), su brads


Monday, July 14, 2008

Design: Blog Banners


There have been so many items which I have been working on over the past few weeks. The demand for Blog Banners is overwhelming (as is the demand for watermarks and signatures). Thank you for your patience and your willingness to let me create your special design. Here are three that I finalized this week. Ida had a great matching watermark for her blog. This one is a recent favorite. I love the colors we put together:


And these little ladybugs - do you not just love them? I made them myself!


Di wanted a western theme - I made this paisley paper just for her!


There are so many in queue that I am working on! Please send me an email if you love these designs and want to see your blog banner FreckledANDfun!

Saturday, July 12, 2008

FS71: Denidill (again)

{Friggin' Idiot! ~ Napoleon Dynomite}

That's me! Goofin around, not payin' attention. I featured Denise a month ago...here is another card...which I created tonight...then had to start from scratch. IMADORK!

The guava and the white base papers are corner rounded - I used two cuttlebug folders (swiss dots and floral fantasy) to create the background on the guava paper. I eliminated the flower and used layered stars instead. I used the Kitchen Sink Stamp Set playful stars with guava and blush ink, then trimmed them and layered them atop one another. The sentiment is from the three step hibiscus set. I used blush ink with the star on the background of the sentiment. The sentiment is stamped in guava. I used a scalloped square, then a trimmed square for the sentiment. I kept the pearls on the side. White sheer polkadot ribbon and guava ribbon complete the card. Sakura stardust on the layered stars, just a smidge here and there on the edges and details of the stars.
~~~~~~~~~~~~~~~~~
Supplies:
paper: white, guava
ink: guava, blush
misc: cuttlebug (eclecticpaperie - swiss dots, floral fantasy), ribbon (starlitstudio & SU), sakura stardust, dimensionals.

FS75: Stephanie.hargis

I had another DUH! night. I looked in my pms, selected a card, made the changes, got ready to upload and DUH! I already used that FS. I don't know why I do that (believe me, it is not the first time). I will post that card later tonight....seriously, it is a nice card...I just cannot believe that I spent so much time on it, then had to go back to square one! Thank Goodness Todd is in bed! So, on to the next person on my list. Sheesh, IMADORK! Here is the featured stamper....Stephanie.hargis. I chose this card by Stephanie. I loved that she used a Riley. I chose a Sophie G! pirate (ARRRGH!). I love Sophie G. Pirate! I stamped her (using my new acrylic block on the circle technique). I colored her in with copics and then placed her on the scalloped pink circle. I dotted the circle with pink sakura stardust. I also used a smidge/smudge of white craft on the edges. The background of the kraft was stamped with versamark and a stamp from the Ahoy Matey (SU!) stamp set. The layer of blush is on the bottom, just below that, I sewed a zig zag stitch. That was a change, since Stephanie used the mat pack and paper piercer. I punched the ahoy matey sentiment with the small SU! oval punch and mounted it on dimensionals. I used pink ink on the sentiment and then edged it with white craft ink. I also edged the whole card with the white craft. Finally - BOW-A-LICIOUS pink bow! YOWZA! That is a Mayarts/starlitstudio purchase! Yummy, huh?

Check out Stephanie's gallery here.

~~~~~~~~~~~~~~~~~~~~~~~~~~~~~~~~~~~~~
supplies:

stamp: Riley/Sophie G. Pirate, ahoy matey (SU)
paper: kraft, white, pretty in pink, blush blossom (SU)
ink: black, copics, pretty in pink, versamark, white craft
misc: ribbon, dimensionals, pink sakura, punches, sewing

Friday, July 11, 2008

Idea!!! Clear Blocks

I just {heart} Tarjay! I love that I can go in there and find ANYTHING that I need. I bet you could live in Target! Who was I having this conversation with? I cannot remember. I do remember that the only problem is there is no washer and dryer. You can pretty much take care of everything in the Tarjay though. Coffee pots (and I found this new YUMMY coffee creamer there - International delight White Chocolate Mocha).

I swear that Todd is addicted to S'mores! Everytime we go to the store he is buying marshmallows, graham crackers and hershey bars. The man is nuts for S'mores! NUTS! What could make S'mores even better? Chocolate Marshmallows! (bouncing).

We found chocolate marshmallows at the TARJAY! {nods!}

It's great to find a great thing, like S'mores and find something to make them even better {like chocolate marshmallows}!

Well, I think I found something like that in my stamp stash.
My good friend Mish is one of those people who inspires me to be a more efficient stamper. You have out your supplies - you might as well use them and be more efficient. So when I have to make a supply of cards, I turn to Mish's idea and mass produce with paper, ink, punches. Simplify and make an assembly line of things! Despite my investment in the nestabilities, I still use my punches on occasion, and for this project I could use the punch or the nestabilities.


Did you ever have a wood mounted image you want to use, but you fumble around trying to get it to line it up to fit within your punched image. I always had problems lining up the image. I would try and fumble around, circular filing most of my attempts. If I put the wood mounted image face up on my surface and place the paper down, I had trouble with shadowing and getting a nice clean image!

Edited to add:
Now I know that you can stamp the images first, then punch them out - but that slows me down when I am doing mass assembly. If there was a perfect way to stamp 10 images on a sheet of cardstock, then punch the giga circle punch out with the images perfectly aligned every time - I would do it. For mass assembly, this works better. So for those of you who have space perception issues like me, read on.... This is even more important for nesties owners who want to mass punch their paper. I found it tough to line up the nestie dies (I use a sizzix with my nesties). It always seems to shift the paper slightly and my pre-stamped image is offset! (that makes me :< sad)

One of the items which is now always in my stamping area is clear acrylic blocks. This morning, the lightbulb went off!!!!

I think I have an idea (bouncing)....

First - gather your supplies:
paper, ink, stamps (wood mounted), mono and a clear block.
I had this clear block from (Dah Dah DAH! The Tarjay dollar spot)


Punch out the circles in white cardstock....

Take your mono and place a little dab on the card

place your circle on a clear block

ink up your wood mounted image


place the inked image face up on your work surface
with the help of the clear block, you can easily place the paper
over the wood mounted image


gently press on your acrylic block. The hard surface gives you a nice firm even pressure for
a great clean stamped image
lift acrylic block off wood mounted image and you have a clean image
without shadows. The clear block holds your paper in place (with the mono), so there is no shifting or double imaging. Mass production is now simplified!


Finish your card

~~~~~~~~~~~~~~~~~~~~~~~~~~~~~~~
supplies:
stamps: If the Halo Fits (SU), sentiment (fresh cuts)
ink: black, copics, chocolate chip, pixie pink
paper: white, designer paper (MME/WA)
misc: dimensionals, sakura stardust, ribbon (mayarts/starlistudio), punches (marvy)


blogger templates | Make Money Online